Onion Noodles, AKA Why I Always Bring Onion Soup Mix

So I’ve been off traveling for almost a week in a new city. It’s difficult to always find food with enough salt content, plus I get bored with eating out all of the time so I try to bring things I can make on the road. I knew I would be making a stop at a relative’s house, so I brought a few key supplies with me. You know how it’s important in Hitchhiker’s Guide to the Galaxy to always have a towel? That’s how I feel about onion soup mix, and here’s why:

It’s portable. It’s loaded with salt. It’s already a bunch of seasoning mixed together. It makes you 100% seem more prepared.

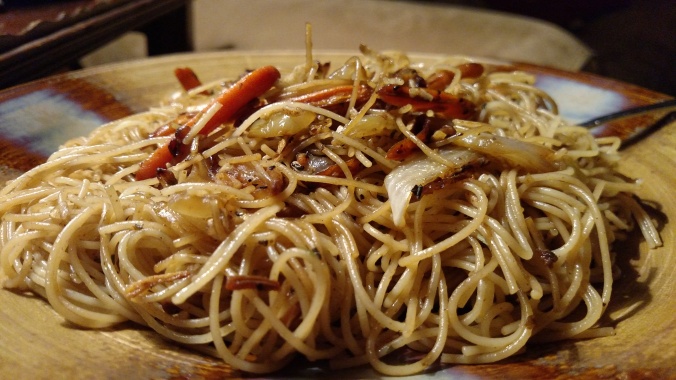
So on this trip I took two vegetables that travel well (carrots and onions), a box of dried pasta, and a packet of onion soup mix and made it dinner.

IMG_20170710_211959332

Onion Noodles

Motivation rating: If you have a chair in the kitchen it’s a great opportunity to get some reading done.
Planning rating: What’s ‘planning’?
Salt rating: One onion soup mix packet has about 100% of an average person’s daily sodium.

Ingredients:
Baby/regular carrots
1/2 an onion
1/2 a box of pasta
1 packet onion soup mix
Pepper and additional salt to taste

Step 1: Get water boiling for the pasta.

Step 2: Based on a sliding scale of motivation, cut the carrots and onion. I was feeling ambitious and did nice even cuts of quartered baby carrots and onion wedges.

Step 3: Saute the vegetables in a bit of oil with salt and pepper.

Step 4: Pull out a book or cell phone and wait. Possibly play the neighbor game with someone. (Who would you rather have as a neighbor… Lady Gaga or Madonna? Someone who has an extensive clown decor collection or someone who thinks they’re a real life 1800s cowboy?)

Step 5: Cook noodles according to directions and give the vegetables an occasional stir. Drain the noodles and add to the vegetable pan.

IMG_20170710_211053879

Ready and waiting for onion soup mix.

Step 6: Once the noodles and veg are more integrated and the noodles have a bit of oily coating, add the onion mix and stir. I used two forks to make integrating the mix easier.

Polenta Bake

I had never heard of polenta until I moved halfway across the country in my 20s. Down south we had grits, none of this polenta stuff. It took a while for me to trust the kind of squishy tubes of prepared cornmeal, but now it’s one of my go-to dinners when I don’t have much energy because of how long tubes of polenta can stay good in the pantry and how simple this recipe is.

Polenta Bake

Motivation rating: Low. Slice one soft thing, poke some holes in tomatoes and you’re good to go. 
Planning rating: My #1 low energy go-to dinner
Salt rating: Salted tomatoes + salted polenta (You add a lot of salt throughout)

Ingredients:
1 tube prepared polenta
1 pint small tomatoes (cherry, grape, multi colored, whatever you want)
Salt
1 tsp nutritional yeast
1 tsp onion powder
1 tsp garlic powder
Olive oil for drizzling
Basil (optional)

Step 1: Preheat the oven to 350F and dig out either two pie pans, or a sheet pan with a lip all the way around. As you may remember, I keep forgetting and buying pie tins so I prepare this in those. It usually works out well because I get one tin to myself while my partner gets the other- no dividing up servings and an easy clean up.

Step 2: Cut open the roll of polenta (or, if you’re like me wash the plastic wrapper then slice through it with a clean knife because I don’t have the energy to deal with scissors). Slice into 1/2 inch slices. Wash the tomatoes and poke a small hole in each tomato with the tip of the knife. This keeps them from popping or exploding in the oven, and helps get the tomato juice to flavor the polenta.

IMG_20170627_180144054

The store had basil and garlic flavored polenta this week.

Step 3: Sprinkle some salt over the tomatoes to help bring out the flavor and let sit for a minute. The salt will get inside through the hole you poked. I don’t need an excuse to salt anything, but if you’re curious why salting tomatoes helps them taste better check it out here. (Via Serious Eats)

IMG_20170627_181247756

Step 4: Lay out the polenta flat on the tin, and along the sides if you have extra. Add tomatoes in the gap areas to help distribute the flavor. Top with nutritional yeast, onion powder, garlic powder, and a healthy sprinkle of salt. I added table salt and a bit of coarse ground sea salt. Then drizzle with olive oil. If you want, you can also add balsamic vinegar at this step.

Step 5: Put in the pre-heated oven for 20 minutes, then check to see when edges are golden brown to your liking. If you let it go too long the polenta can be a bit hard, so what we’re aiming for here is crispy outside and soft inside.

IMG_20170627_191417514

This is a rare moment, we usually eat it straight out of the pie tin.

Step 6: If you feel like, top with basil and salt to taste.

Chocolate Chip, Pecan, and Sea Salt Cookies

One perk of not using dairy or eggs in baking is being able to eat cookie dough and not have to worry about food poisoning. Sometimes, some of my cookies even make it into the oven. I was having a hardcore salty/sweet combination craving a few weeks ago. Luckily, one of my old friends was in town and was generous enough to volunteer to come over and suffer through some cookie taste testing with me. It was a long, arduous day of eating cookie dough but we survived it just to bring you this recipe: chocolate chip, pecan, and sea salt cookies. Be warned, this makes a lot of cookies. If you want, you can make a few big cookies instead of many moderately sized ones. I won’t tell.

Chocolate Chip, Pecan, and Sea Salt Cookies

Motivation rating: Moderate. Cookie dough requires mixing, after all.
Planning rating: Ready shortly after you think, “Hey, cookies sound good”
Salt rating: Pecans (or other nuts), salt in the dough, plus a sea salt topping

Ingredients:
2 cups all-purpose flour (bleached or unbleached, I use unbleached)
3/4 tsp table or kosher salt
1 tsp baking powder
1 tsp baking soda
1/2 to 1 bag of dark chocolate chips, depending on your chocolate craving
1/2 cup pecans or other nuts
1/2 cup white sugar
1/2 cup dark brown sugar (or light brown sugar + molasses)
1/4 cup canola oil
1/2 cup nondairy milk (I use sweetened almond milk)
a small bowl of coarse sea salt to roll cookie dough balls in

I think adding dried cherries would also be good. Let me know if you try any dried fruit!

Steps:

1. Grab a medium bowl and mix flour, salt, baking powder, and baking soda. After you stare at the white pile of ingredients for an adequate amount of time, questioning if you actually mixed it or just imagined you did (thanks brain fog), add the chocolate chips and nuts.

IMG_20170625_180024812

2. Grab a freezer-safe large bowl or Tupperware container and dump in the two kinds of sugar. Add the oil and nondairy milk. Whisk with a real whisk or a fork. I use a fork because I’ve been meaning to buy a whisk for years but forget what I’m there to get as soon as I walk into the store (on the plus side I now own three pie tins).

IMG_20170625_181355343.jpg

Don’t be like me and forget you need a big bowl, because then you have to swap bowls.

3. Add the dry mix to the wet and stir well. You may have to fold the chocolate chips and nuts in a bit. This is a good place to have a hand mixer, stand mixer, or friend you can bribe with cookies.


4. Stick that sucker in the freezer for 20 minutes to chill the dough. This helps it keep its form for the salt and while baking. In the meantime, preheat the oven to 350F and put some foil or parchment paper on a cookie sheet.

5. Pull it from the freezer and plop yourself down at a table. Using a tablespoon, roll balls of dough. Once it’s formed, roll it in the bowl of sea salt and place on the sheet pan. If you’re sharing the cookies with that friend who helped you mix, sprinkle some salt on top instead so you don’t give your friend a heart attack. If you endanger your friends they probably won’t help you bake anymore.

IMG_20170625_211633381.jpg

Sometimes your rolled balls of dough are more abstract.

6. Bake at 350F for 13 minutes or until they’re golden to your liking.

OR

Rather than heating up the oven…pull the dough from the freezer, form balls, roll in salt, and eat. Why waste time and make the house hotter with the oven?

IMG_20170625_222640585.jpg